Travailler avec la transparence dans un fichier XPS | Java
Ajouter un objet transparent dans le document XPS
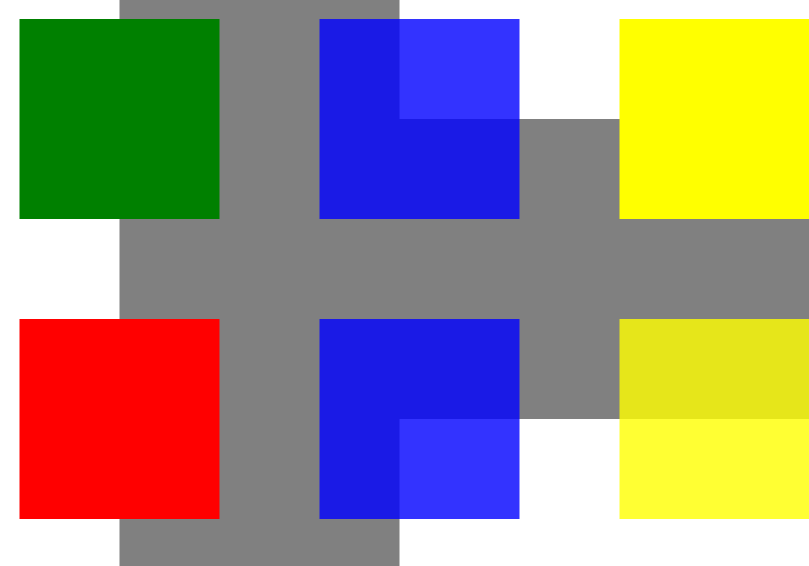
Aspose.Page pour Java propose la classe XpsPath , avec laquelle vous pouvez ajouter un objet transparent sur un document XPS. Vous devez spécifier PathGeometry et l’ajouter à XpsPath. L’extrait de code suivant montre la fonctionnalité complète permettant d’ajouter un objet transparent sur un document XPS :
 1// For complete examples and data files, please go to https://github.com/aspose-page/Aspose.Page-for-Java
 2// The path to the documents directory.
 3String dataDir = Utils.getDataDir();
 4// Initialize document
 5XpsDocument doc = new XpsDocument();
 6// Just to demonstrate transparency
 7doc.addPath(doc.createPathGeometry("M120,0 H400 v1000 H120")).setFill(doc.createSolidColorBrush(Color.GRAY));
 8doc.addPath(doc.createPathGeometry("M300,120 h600 V420 h-600")).setFill(doc.createSolidColorBrush(Color.GRAY));
 9
10// Create path with closed rectangle geometry
11XpsPath path1 = doc.createPath(doc.createPathGeometry("M20,20 h200 v200 h-200 z"));
12// Set blue solid brush to fill path1
13path1.setFill(doc.createSolidColorBrush(Color.BLUE));
14// Add it to the current page
15XpsPath path2 = doc.add(path1);
16
17// path1 and path2 are the same as soon as path1 hasn't been placed inside any other element
18// (which means that path1 had no parent element).
19// Because of that rectangle's color on the page effectively turns to green
20path2.setFill(doc.createSolidColorBrush(Color.GREEN));
21
22// Now add path2 once again. Now path2 has parent. So path3 won't be the same as path2.
23// Thus a new rectangle is painted on the page ...
24XpsPath path3 = doc.add(path2);
25// ... and we shift it 300 units lower ...
26path3.setRenderTransform(doc.createMatrix(1, 0, 0, 1, 0, 300));
27// ... and set red solid brush to fill it
28path3.setFill(doc.createSolidColorBrush(Color.RED));
29
30// Create new path4 with path2's geometry ...
31XpsPath path4 = doc.addPath(path2.getData());
32// ... shift it 300 units to the right ...
33path4.setRenderTransform(doc.createMatrix(1, 0, 0, 1, 300, 0));
34// ... and set blue solid fill
35path4.setFill(doc.createSolidColorBrush(Color.BLUE));
36
37// Add path4 once again.
38XpsPath path5 = doc.add(path4);
39// path4 and path5 are not the same again ...
40// (move path5 300 units lower)
41path5.setRenderTransform(path5.getRenderTransform().deepClone()); // to disconnect RenderTransform value from path4 (see next comment about Fill property)
42path5.getRenderTransform().translate(0, 300);
43// ... but if we set the opacity of Fill property, it will take effect on both path5 and path4
44// because brush is a complex property value which remains the same for path5 and path4
45path5.getFill().setOpacity(0.8f);
46
47// Create new path6 with path2's geometry ...
48XpsPath path6 = doc.addPath(path2.getData());
49// ... shift it 600 units to the right ...
50path6.setRenderTransform(doc.createMatrix(1, 0, 0, 1, 600, 0));
51// ... and set yellow solid fill
52path6.setFill(doc.createSolidColorBrush(Color.YELLOW));
53
54// Now add path6's clone ...
55XpsPath path7 = doc.add(path6.deepClone());
56// (move path5 300 units lower)
57path7.setRenderTransform(path7.getRenderTransform().deepClone());
58path7.getRenderTransform().translate(0, 300);
59// ... and set opacity for path7
60path7.getFill().setOpacity(0.8f);
61// Now opacity effects independently as soon as property values are cloned along with the element
62
63// The following code block is equivalent to the previous one.
64// Add path6 itself. path6 and path7 are not the same. Although their Fill property values are the same
65//XpsPath path7 = doc.Add(path6);
66//path7.RenderTransform = path7.RenderTransform.Clone();
67//path7.RenderTransform.Translate(0, 300);
68// To "disconnect" path7's Fill property from path6's Fill property reassign it to its clone (or path6's Fill clone)
69//path7.Fill = ((XpsSolidColorBrush)path7.Fill).Clone();
70//path7.Fill.Opacity = 0.8f;
71
72doc.save(dataDir + "WorkingWithTransparency_out.xps");Le résultat

Définir le masque d’opacité
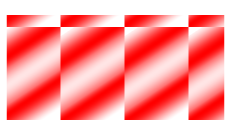
La solution propose la propriété setOpacityMask() , avec laquelle vous pouvez définir un masque d’opacité sur un document XPS. Vous devez créer PathGeometry et l’ajouter à XpsPath. Une image peut être utilisée comme masque d’opacité et le composant Alpha de chaque pixel est utilisé pour l’appliquer sur le remplissage sous-jacent. Le document XPS généré affichera des bandes de dégradé obliques comme présent sur le fichier image source. L’extrait de code suivant montre la fonctionnalité complète permettant de définir le masque d’opacité :
 1// For complete examples and data files, please go to https://github.com/aspose-page/Aspose.Page-for-Java
 2// The path to the documents directory.
 3String dataDir = Utils.getDataDir();
 4// Create a new XPS document
 5XpsDocument doc = new XpsDocument();
 6// New canvas
 7XpsCanvas canvas = doc.addCanvas();
 8// Rectangle in the middle left with opacity masked by ImageBrush
 9XpsPath path = canvas.addPath(doc.createPathGeometry("M 10,180 L 228,180 228,285 10,285"));
10path.setFill(doc.createSolidColorBrush(doc.createColor(1.0f, 0.0f, 0.0f)));
11path.setOpacityMask(doc.createImageBrush(dataDir +  "R08SY_NN.tif",
12                new Rectangle2D.Float(0f, 0f, 128f, 192f),	new Rectangle2D.Float(0f, 0f, 64f, 96f)));
13((XpsImageBrush)path.getOpacityMask()).setTileMode(XpsTileMode.Tile);
14// Save resultant XPS document
15doc.save(dataDir + "OpacityMask_out.xps");Le résultat

Vous pouvez télécharger des exemples et des fichiers de données à partir de GitHub.