PDFにテーブルを作成または追加する
テーブルの作成
Aspose.PDF 名前空間には、PDF ドキュメントを最初から生成する際にテーブルを作成するための機能を提供する Table、Cell、および Row という名前のクラスが含まれています。
テーブルは Table クラスのオブジェクトを作成することで作成できます。
Aspose.Pdf.Table table = new Aspose.Pdf.Table();
既存のPDFドキュメントにテーブルを追加する
Aspose.PDF for Javaを使用して既存のPDFファイルにテーブルを追加するには、次の手順を実行します。
-
ソースファイルをロードします。
-
テーブルを初期化し、その列と行を設定します。
-
テーブル設定を行います(境界線を設定しました)。
-
テーブルにデータを入力します。
-
ページにテーブルを追加します。
-
ファイルを保存します。
以下のコードスニペットは、既存のPDFファイルにテキストを追加する方法を示しています。
package com.aspose.pdf.examples;
import com.aspose.pdf.*;
public class ExampleAddTable {
private static String _dataDir = "/home/admin1/pdf-examples/Samples/";
public static void CreateTable() {
Document doc = new Document(_dataDir + "input.pdf");
// テーブルの新しいインスタンスを初期化します
Table table = new Table();
// テーブルの境界線の色をLightGrayに設定します
table.setBorder(new BorderInfo(BorderSide.All, .5f, Color.getLightGray()));
// テーブルセルの境界線を設定します
table.setDefaultCellBorder(new BorderInfo(BorderSide.All, .5f, Color.getLightGray()));
// 10行を追加するループを作成します
for (int row_count = 1; row_count < 10; row_count++) {
// テーブルに行を追加します
Row row = table.getRows().add();
// テーブルセルを追加します
row.getCells().add("Column (" + row_count + ", 1)");
row.getCells().add("Column (" + row_count + ", 2)");
row.getCells().add("Column (" + row_count + ", 3)");
}
// 入力ドキュメントの最初のページにテーブルオブジェクトを追加します
doc.getPages().get_Item(1).getParagraphs().add(table);
// テーブルオブジェクトを含む更新されたドキュメントを保存します
doc.save(_dataDir + "document_with_table.pdf");
}
Aspose.PDF テーブルの ColSpan と RowSpan を Java で使用する
Aspose.PDF for Java は、テーブル内の列を結合するための setColSpan メソッドと、行を結合するための setRowSpan メソッドを提供します。
Cell オブジェクトに setColSpan または setRowSpan メソッドを使用し、テーブルセルを作成します。必要なプロパティを適用した後、作成したセルをテーブルに追加できます。
public static void AddTable_RowColSpan() {
// ソース PDF ドキュメントを読み込む
Document pdfDocument = new Document();
Page page = pdfDocument.getPages().add();
// Table の新しいインスタンスを初期化する
Table table = new Table();
// テーブルの境界線の色をライトグレーに設定する
table.setBorder(new BorderInfo(BorderSide.All, .5f, Color.getBlack()));
// テーブルセルの境界線を設定する
table.setDefaultCellBorder(new BorderInfo(BorderSide.All, .5f, Color.getBlack()));
// テーブルに第1行を追加する
Row row1 = table.getRows().add();
for (int cellCount = 1; cellCount < 5; cellCount++) {
// テーブルセルを追加する
row1.getCells().add("Test 1 " + cellCount);
}
// テーブルに第2行を追加する
Row row2 = table.getRows().add();
row2.getCells().add("Test 2 1");
Cell cell = row2.getCells().add("Test 2 2");
cell.setColSpan(2);
row2.getCells().add("Test 2 4");
// テーブルに第3行を追加する
Row row3 = table.getRows().add();
row3.getCells().add("Test 3 1");
row3.getCells().add("Test 3 2");
row3.getCells().add("Test 3 3");
row3.getCells().add("Test 3 4");
// テーブルに第4行を追加する
Row row4 = table.getRows().add();
row3.getCells().add("Test 4 1");
cell = row3.getCells().add("Test 4 2");
cell.setRowSpan(2);
row3.getCells().add("Test 4 3");
row3.getCells().add("Test 4 4");
// テーブルに第5行を追加する
row4 = table.getRows().add();
row4.getCells().add("Test 5 1");
row4.getCells().add("Test 5 3");
row4.getCells().add("Test 5 4");
// テーブルオブジェクトを入力ドキュメントの最初のページに追加する
page.getParagraphs().add(table);
// テーブルオブジェクトを含む更新されたドキュメントを保存する
pdfDocument.save(_dataDir + "document_with_table_out.pdf");
}
コードの実行結果は、次の画像に示されているテーブルです。

境界線、余白、パディングの操作
Aspose.PDF for Java を使用すると、開発者は PDF ドキュメントにテーブルを作成できます。Aspose.PDF のドキュメントオブジェクトモデルによると、テーブルは段落レベルの要素です。
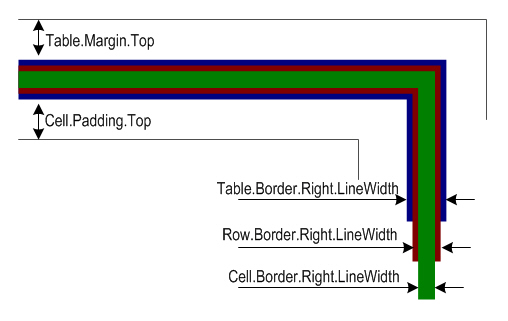
また、テーブルの境界線スタイル、余白、セルのパディングを設定する機能もサポートしていることに注意してください。技術的な詳細に入る前に、以下の図で示されている境界線、余白およびパディングの概念を理解することが重要です:

上の図では、テーブル、行、セルの境界線が重なっていることがわかります。Aspose.PDF を使用すると、テーブルには余白を設定でき、セルにはパディングを設定できます。セルの余白を設定するには、セルのパディングを設定する必要があります。
境界線
テーブル、Row、Cell オブジェクトの境界線を設定するには、Table.setBorder、Row.setBorder および Cell.setBorder メソッドを使用します。 セルの境界線は、Table または Row クラスの DefaultCellBorder メソッドを使用して設定することもできます。上記で説明したすべての境界線に関連するプロパティは、Row クラスのインスタンスに割り当てられます。このインスタンスは、コンストラクタを呼び出すことで作成されます。Row クラスには、多くのオーバーロードがあり、境界線をカスタマイズするために必要なほとんどすべてのパラメータを取ります。
マージンまたはパディング
セルのパディングは、Table クラスの DefaultCellPadding メソッドを使用して管理できます。 すべてのパディング関連プロパティは、Left、Right、Top、Bottomパラメータに関する情報を取得してカスタム余白を作成するMarginInfoクラスのインスタンスが割り当てられています。
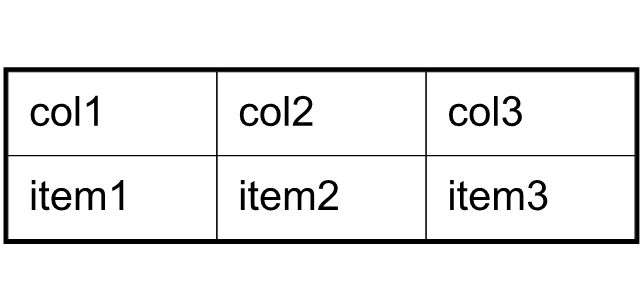
次の例では、セルの枠線の幅を0.1ポイントに、テーブルの枠線の幅を1ポイントに、セルのパディングを5ポイントに設定します。

public static void MargingPadding() {
// 空のコンストラクタを呼び出してDocumentオブジェクトをインスタンス化する
Document doc = new Document();
Page page = doc.getPages().add();
// テーブルオブジェクトをインスタンス化する
Table tab1 = new Table();
// 目的のセクションの段落コレクションにテーブルを追加する
page.getParagraphs().add(tab1);
// テーブルの列幅を設定する
tab1.setColumnWidths ("50 50 50");
// BorderInfoオブジェクトを使用してデフォルトのセル枠線を設定する
tab1.setDefaultCellBorder(new BorderInfo(BorderSide.All, 0.1F));
// カスタマイズされた別のBorderInfoオブジェクトを使用してテーブル枠線を設定する
tab1.setBorder (new BorderInfo(BorderSide.All, 1F));
// MarginInfoオブジェクトを作成し、その左、下、右、上の余白を設定する
MarginInfo margin = new MarginInfo();
margin.setTop (5f);
margin.setLeft (5f);
margin.setRight (5f);
margin.setBottom (5f);
// デフォルトのセルパディングをMarginInfoオブジェクトに設定する
tab1.setDefaultCellPadding(margin);
// テーブルに行を作成し、その行にセルを作成する
Row row1 = tab1.getRows().add();
row1.getCells().add("col1");
row1.getCells().add("col2");
row1.getCells().add();
TextFragment mytext = new TextFragment("col3 with large text string");
row1.getCells().get_Item(2).getParagraphs().add(mytext);
row1.getCells().get_Item(2).setWordWrapped(false);
Row row2 = tab1.getRows().add();
row2.getCells().add("item1");
row2.getCells().add("item2");
row2.getCells().add("item3");
// PDFを保存する
doc.save(_dataDir + "MarginsOrPadding_out.pdf");
}
}
テーブルを角丸で作成するには、BorderInfoクラスのRoundedBorderRadiusの値を使用し、テーブルのコーナースタイルをラウンドに設定します。
public static void RoundedBorderRadius() {
Document doc = new Document();
Page page = doc.getPages().add();
// テーブルオブジェクトをインスタンス化
Table tab1 = new Table();
// 希望のセクションの段落コレクションにテーブルを追加
page.getParagraphs().add(tab1);
GraphInfo graph = new GraphInfo();
graph.setColor(Color.getRed());
// 空白のBorderInfoオブジェクトを作成
BorderInfo bInfo = new BorderInfo(BorderSide.All, graph);
// 角の半径が15の丸い境界を設定
bInfo.setRoundedBorderRadius(15);
// テーブルのコーナースタイルをラウンドに設定
tab1.setCornerStyle(BorderCornerStyle.Round);
// テーブルの境界情報を設定
tab1.setBorder(bInfo);
// テーブルに行を作成し、その行にセルを作成
Row row1 = tab1.getRows().add();
row1.getCells().add("col1");
row1.getCells().add("col2");
row1.getCells().add();
TextFragment mytext = new TextFragment("col3 with large text string");
row1.getCells().get_Item(2).getParagraphs().add(mytext);
row1.getCells().get_Item(2).setWordWrapped(false);
Row row2 = tab1.getRows().add();
row2.getCells().add("item1");
row2.getCells().add("item2");
row2.getCells().add("item3");
// PDFを保存
doc.save(_dataDir + "BorderRadius_out.pdf");
}
ColumnAdjustmentType 列挙内の AutoFitToWindow プロパティ
public static void AutoFitToWindowProperty() {
// 空のコンストラクタを呼び出して Pdf オブジェクトをインスタンス化
Document doc = new Document();
// Pdf オブジェクトにセクションを作成
Page sec1 = doc.getPages().add();
// テーブルオブジェクトをインスタンス化
Table tab1 = new Table();
// 目的のセクションの段落コレクションにテーブルを追加
sec1.getParagraphs().add(tab1);
// テーブルの列幅を設定
tab1.setColumnWidths("50 50 50");
tab1.setColumnAdjustment(ColumnAdjustment.AutoFitToWindow);
// BorderInfo オブジェクトを使用してデフォルトのセル境界を設定
tab1.setDefaultCellBorder(new BorderInfo(BorderSide.All, 0.1F));
// 別のカスタマイズされた BorderInfo オブジェクトを使用してテーブルの境界を設定
tab1.setBorder(new BorderInfo(BorderSide.All, 1F));
// MarginInfo オブジェクトを作成し、左、下、右、上のマージンを設定
MarginInfo margin = new MarginInfo();
margin.setTop(5f);
margin.setLeft(5f);
margin.setRight(5f);
margin.setBottom(5f);
// MarginInfo オブジェクトにデフォルトのセルパディングを設定
tab1.setDefaultCellPadding(margin);
// テーブルに行を作成し、その行にセルを作成
Row row1 = tab1.getRows().add();
row1.getCells().add("col1");
row1.getCells().add("col2");
row1.getCells().add("col3");
Row row2 = tab1.getRows().add();
row2.getCells().add("item1");
row2.getCells().add("item2");
row2.getCells().add("item3");
// テーブルオブジェクトを含む更新されたドキュメントを保存
doc.save(_dataDir + "AutoFitToWindow_out.pdf");
}
テーブルの幅を取得
時には、テーブルの幅を動的に取得する必要があります。Aspose.PDF.Table クラスには、この目的のためのメソッド GetWidth があります。例えば、テーブルの列幅を明示的に設定せず、ColumnAdjustment を AutoFitToContent に設定している場合、以下のようにしてテーブルの幅を取得できます。
public static void GetTableWidth() {
// 新しいドキュメントを作成
Document doc = new Document();
// ドキュメントにページを追加
Page page = doc.getPages().add();
// 新しいテーブルを初期化
Table table = new Table();
// 必要なセクションの段落コレクションにテーブルを追加
page.getParagraphs().add(table);
table.setColumnAdjustment(ColumnAdjustment.AutoFitToContent);
// テーブルに行を追加
Row row = table.getRows().add();
// テーブルにセルを追加
row.getCells().add("セル 1 テキスト");
row.getCells().add("セル 2 テキスト");
// テーブルの幅を取得
System.out.println(table.getWidth());
}
テーブルセルにSVGオブジェクトを追加
Aspose.PDF for Javaは、PDFファイルにテーブルセルを追加する機能をサポートしています。テーブルを作成する際、セルにテキストや画像を追加することが可能です。さらに、APIはSVGファイルをPDF形式に変換する機能も提供しています。これらの機能を組み合わせることで、SVG画像を読み込み、テーブルセルに追加することが可能です。
次のコードスニペットは、テーブルインスタンスを作成し、テーブルセル内にSVG画像を追加する手順を示しています。
public static void AddSVGObjectToTableCell() {
// Documentオブジェクトをインスタンス化
Document doc = new Document();
// 画像インスタンスを作成
com.aspose.pdf.Image img = new com.aspose.pdf.Image();
// 画像タイプをSVGに設定
img.setFileType (com.aspose.pdf.ImageFileType.Svg);
// ソースファイルのパス
img.setFile (_dataDir + "SVGToPDF.svg");
// 画像インスタンスの幅を設定
img.setFixWidth (50);
// 画像インスタンスの高さを設定
img.setFixHeight (50);
// テーブルインスタンスを作成
com.aspose.pdf.Table table = new com.aspose.pdf.Table();
// テーブルセルの幅を設定
table.setColumnWidths ("100 100");
// 行オブジェクトを作成し、テーブルインスタンスに追加
com.aspose.pdf.Row row = table.getRows().add();
// セルオブジェクトを作成し、行インスタンスに追加
com.aspose.pdf.Cell cell = row.getCells().add();
// セルオブジェクトの段落コレクションにテキストフラグメントを追加
cell.getParagraphs().add(new TextFragment("First cell"));
// 行オブジェクトに別のセルを追加
cell = row.getCells().add();
// 最近追加されたセルインスタンスの段落コレクションにSVG画像を追加
cell.getParagraphs().add(img);
// ページオブジェクトを作成し、ドキュメントインスタンスのページコレクションに追加
Page page = doc.getPages().add();
// ページオブジェクトの段落コレクションにテーブルを追加
page.getParagraphs().add(table);
// PDFファイルを保存
doc.save(_dataDir + "AddSVGObject_out.pdf");
}
テーブル内にHTMLタグを追加
Aspose.PDF for Javaを使用すると、PDFファイルの段落に新しいHTMLフラグメントを追加することができます。
public static void AddHTMLFragmentToTableCell() {
Document doc = new Document(_dataDir + "input.pdf");
// テーブルの新しいインスタンスを初期化
Table table = new Table();
// テーブルの境界線の色をLightGrayに設定
table.setBorder(new BorderInfo(BorderSide.All, .5f, Color.getLightGray()));
// テーブルセルの境界線を設定
table.setDefaultCellBorder(new BorderInfo(BorderSide.All, .5f, Color.getLightGray()));
// 10行を追加するループを作成
for (int row_count = 1; row_count < 10; row_count++) {
Cell cell;
// テーブルに行を追加
Row row = table.getRows().add();
// テーブルセルを追加
cell = row.getCells().add();
cell.getParagraphs().add(new HtmlFragment("Column <strong>(" + row_count + ", 1)</strong>"));
cell = row.getCells().add();
cell.getParagraphs().add(new HtmlFragment("Column <span style='color:red'>(" + row_count + ", 2)</span>"));
cell = row.getCells().add();
cell.getParagraphs().add(new HtmlFragment("Column <span style='text-decoration: underline'>(" + row_count + ", 3)</span>"));
}
// 入力ドキュメントの最初のページにテーブルオブジェクトを追加
doc.getPages().get_Item(1).getParagraphs().add(table);
// テーブルオブジェクトを含む更新されたドキュメントを保存
doc.save(_dataDir + "AddHTMLObject_out.pdf");
}
}
行の間にページ区切りを挿入する
デフォルトの動作として、PDFファイル内にテーブルを作成する際、テーブルがテーブルの下マージンに達すると、テーブルは次のページに流れます。ただし、特定の行数がテーブルに追加されたときに強制的にページ区切りを挿入する必要がある場合があります。次のコードスニペットは、テーブルに10行が追加されたときにページ区切りを挿入する手順を示しています。
public static void InsertPageBreak() {
// Documentインスタンスをインスタンス化
Document doc = new Document();
// PDFファイルのページコレクションにページを追加
Page page = doc.getPages().add();
// Tableインスタンスを作成
Table tab = new Table();
// テーブルの境界スタイルを設定
tab.setBorder (new BorderInfo(BorderSide.All, Color.getRed()));
// 境界色を赤にしてテーブルのデフォルト境界スタイルを設定
tab.setDefaultCellBorder (new BorderInfo(BorderSide.All, Color.getRed()));
// テーブルの列幅を指定
tab.setColumnWidths ("100 100");
// 200行をテーブルに追加するループを作成
for (int counter = 0; counter <= 200; counter++) {
Row row = new Row();
tab.getRows().add(row);
Cell cell1 = new Cell();
cell1.getParagraphs().add(new TextFragment("Cell " + counter + ", 0"));
row.getCells().add(cell1);
Cell cell2 = new Cell();
cell2.getParagraphs().add(new TextFragment("Cell " + counter + ", 1"));
row.getCells().add(cell2);
// 10行が追加されたら、新しいページに新しい行をレンダリング
if (counter % 10 == 0 && counter != 0)
row.setInNewPage(true);
}
// PDFファイルの段落コレクションにテーブルを追加
page.getParagraphs().add(tab);
// PDFドキュメントを保存
doc.save(_dataDir + "InsertPageBreak_out.pdf");
}
スパンされたセルの境界線を非表示にする
テーブルにセルを追加する際、スパンされたセルの境界線が別の行に分かれると表示されることがあります。このようなスパンされた境界線は、以下のコードサンプルのように非表示にすることができます。
Document doc = new Document();
com.aspose.pdf.Page page = doc.getPages().add();
//外側のテーブル内にネストされ、同じページ内で分かれるテーブルオブジェクトをインスタンス化
com.aspose.pdf.Table mytable = new com.aspose.pdf.Table();
mytable.setBroken(TableBroken.Vertical);
mytable.setDefaultCellBorder(new BorderInfo(BorderSide.All));
mytable.setRepeatingColumnsCount(2);
page.getParagraphs().add(mytable);
//ヘッダー行を追加
com.aspose.pdf.Row row = mytable.getRows().add();
Cell cell = row.getCells().add("header 1");
cell.setColSpan(2);
cell.setBackgroundColor(Color.getLightGray());
Cell header3 = row.getCells().add("header 3");
Cell cell2 = row.getCells().add("header 4");
cell2.setColSpan(2);
cell2.setBackgroundColor(Color.getLightBlue());
row.getCells().add("header 6");
Cell cell3 = row.getCells().add("header 7");
cell3.setColSpan(2);
cell3.setBackgroundColor(Color.getLightGreen());
Cell cell4 = row.getCells().add("header 9");
cell4.setColSpan(3);
cell4.setBackgroundColor(Color.getLightCoral());
row.getCells().add("header 12");
row.getCells().add("header 13");
row.getCells().add("header 14");
row.getCells().add("header 15");
row.getCells().add("header 16");
row.getCells().add("header 17");
for (int rowCounter = 0; rowCounter < 1; rowCounter++)
{
//テーブルに行を作成し、その行にセルを作成
com.aspose.pdf.Row row1 = mytable.getRows().add();
row1.getCells().add("col "+rowCounter+", 1");
row1.getCells().add("col "+rowCounter+", 2");
row1.getCells().add("col "+rowCounter+", 3");
row1.getCells().add("col "+rowCounter+", 4");
row1.getCells().add("col "+rowCounter+", 5");
row1.getCells().add("col "+rowCounter+", 6");
row1.getCells().add("col "+rowCounter+", 7");
row1.getCells().add("col "+rowCounter+", 8");
row1.getCells().add("col "+rowCounter+", 9");
row1.getCells().add("col "+rowCounter+", 10");
row1.getCells().add("col "+rowCounter+", 11");
row1.getCells().add("col "+rowCounter+", 12");
row1.getCells().add("col "+rowCounter+", 13");
row1.getCells().add("col "+rowCounter+", 14");
row1.getCells().add("col "+rowCounter+", 15");
row1.getCells().add("col "+rowCounter+", 16");
row1.getCells().add("col "+rowCounter+", 17");
}
doc.save(dataDir + "3_out.pdf");