PDF 多媒体注释
PDF 文档中的注释包含在 Page 对象的 Annotations 集合中。此集合仅包含该页面的所有注释:每个页面都有其自己的 Annotations 集合。要向特定页面添加注释,请使用 Add 方法将其添加到该页面的 Annotations 集合中。
使用 Aspose.PDF.InteractiveFeatures.Annotations 命名空间中的 ScreenAnnotation 类将 SWF 文件作为注释包含在 PDF 文档中。 屏幕注释指定了页面上的一个区域,可以在该区域播放媒体片段。
当您需要在 PDF 文档中添加外部视频链接时,可以使用 MovieAnnotation。电影注释包含动画图形和声音,可以在计算机屏幕上显示并通过扬声器播放。
声音注释类似于文本注释,但它不包含文本注释,而是包含从计算机麦克风录制的声音或从文件导入的声音。当注释被激活时,声音将被播放。注释在大多数情况下的行为类似于文本注释,但使用不同的图标(默认情况下是扬声器)来表示它代表声音。
但是,当需要在 PDF 文档中嵌入媒体时,您需要使用 RichMediaAnnotation。 RichMediaAnnotation 类的以下方法/属性可以使用。
- Stream CustomPlayer { set; }:允许设置用于播放视频的播放器。
- string CustomFlashVariables { set; }:允许设置传递给 flash 应用程序的变量。该行是一组用‘&’分隔的“key=value”对。
- void AddCustomData(string name, Stream data):为播放器添加额外数据。例如 source=video.mp4&autoPlay=true&scale=100
- ActivationEvent ActivateOn { get; set}:事件激活播放器;可能的值有 Click, PageOpen, PageVisible
- void SetContent(Stream stream, string name):设置要播放的视频/音频数据。
- void Update():创建注释的数据结构。此方法应最后调用
- void SetPoster(Stream):设置视频的海报,即播放器不活动时显示的图片
添加屏幕注释
以下代码片段显示了如何向 PDF 文件添加屏幕注释:
package com.aspose.pdf.examples;
import java.io.FileInputStream;
import java.io.FileNotFoundException;
import java.util.*;
import com.aspose.pdf.*;
public class ExampleMultimediaAnnotation {
// 文档目录的路径。
private static String _dataDir = "/home/admin1/pdf-examples/Samples/";
public static void AddScreenAnnotation() {
// 加载 PDF 文件
Document document = new Document(_dataDir + "sample.pdf");
Page page = document.getPages().get_Item(1);
String mediaFile = _dataDir + "input.swf";
// 创建屏幕注释
ScreenAnnotation screenAnnotation = new ScreenAnnotation(page, new Rectangle(170, 190, 470, 380), mediaFile);
page.getAnnotations().add(screenAnnotation);
document.save(_dataDir + "sample_swf.pdf");
}
}
添加声音注释
以下代码片段展示了如何向 PDF 文件添加声音注释:
public static void AddSoundAnnotation() {
// 加载 PDF 文件
Document document = new Document(_dataDir + "sample.pdf");
Page page = document.getPages().get_Item(1);
String mediaFile = _dataDir + "file_example_WAV_1MG.wav";
// 创建声音注释
SoundAnnotation soundAnnotation = new SoundAnnotation(page, new Rectangle(20, 700, 60, 740), mediaFile);
soundAnnotation.setColor(Color.getBlue());
soundAnnotation.setTitle("John Smith");
soundAnnotation.setSubject("声音注释演示");
soundAnnotation.setPopup(new PopupAnnotation(document));
page.getAnnotations().add(soundAnnotation);
document.save(_dataDir + "sample_wav.pdf");
}
添加富媒体注释
以下代码片段展示了如何向 PDF 文件添加富媒体注释:
public static void AddRichMediaAnnotation() throws FileNotFoundException {
Document doc = new Document();
var pathToAdobeApp = "C:\\Program Files (x86)\\Adobe\\Acrobat 2017\\Acrobat\\Multimedia Skins";
Page page = doc.getPages().add();
// 为视频数据命名。此数据将以此名称嵌入到文档中,并从 Flash 变量中引用此名称。
// videoName 不应包含文件路径;这是访问 PDF 文档内部数据的“键”。
String videoName = "file_example_MP4_480_1_5MG.mp4";
String posterName = "file_example_MP4_480_1_5MG_poster.jpg";
// 我们还使用视频播放器的皮肤
String skinName = "SkinOverAllNoFullNoCaption.swf";
RichMediaAnnotation rma = new RichMediaAnnotation(page, new Rectangle(100, 500, 300, 600));
// 这里我们应该指定包含视频播放器代码的流
rma.setCustomPlayer(new FileInputStream(pathToAdobeApp + "Players" + "Videoplayer.swf"));
// 为播放器编写 Flash 变量行。请注意,不同的播放器可能有不同格式的 Flash 变量行。
// 请参考您播放器的文档。
rma.setCustomFlashVariables("source=" + videoName + "&skin=" + skinName);
// 添加皮肤代码。
rma.addCustomData(skinName, new FileInputStream(pathToAdobeApp + "SkinOverAllNoFullNoCaption.swf"));
// 为视频设置海报
rma.setPoster(new FileInputStream(_dataDir + posterName));
// 设置视频内容
rma.setContent(videoName, new FileInputStream(_dataDir + videoName));
// 设置内容类型(视频)
rma.setType(RichMediaAnnotation.ContentType.Video);
// 点击激活播放器
rma.setActivateOn(RichMediaAnnotation.ActivationEvent.Click);
// 更新注释数据。此方法应在所有赋值/设置后调用。此方法初始化注释的数据结构并嵌入所需数据。
rma.update();
// 在页面上添加注释。
page.getAnnotations().add(rma);
doc.save(_dataDir + "RichMediaAnnotation.pdf");
}
获取多媒体注释
请尝试使用以下代码片段从 PDF 文档中获取多媒体注释。
public static void GetMultimediaAnnotation() {
// 加载 PDF 文件
Document document = new Document(_dataDir + "RichMediaAnnotation.pdf");
Page page = document.getPages().get_Item(1);
AnnotationSelector annotationSelector = new AnnotationSelector(
new RichMediaAnnotation(page, Rectangle.getTrivial()));
page.accept(annotationSelector);
List<Annotation> mediaAnnotations = annotationSelector.getSelected();
for (Annotation ma : mediaAnnotations) {
System.out.println(ma.getAnnotationType() + " " + ma.getRect());
}
}
删除多媒体注释
以下代码片段显示了如何从 PDF 文件中删除多媒体注释。
public static void DeletePolyAnnotation() {
// 加载 PDF 文件
Document document = new Document(_dataDir + "RichMediaAnnotation.pdf");
Page page = document.getPages().get_Item(1);
AnnotationSelector annotationSelector = new AnnotationSelector(
new RichMediaAnnotation(page, Rectangle.getTrivial()));
page.accept(annotationSelector);
List<Annotation> mediaAnnotations = annotationSelector.getSelected();
for (Annotation ma : mediaAnnotations) {
page.getAnnotations().delete(ma);
}
document.save(_dataDir + "RichMediaAnnotation_del.pdf");
}
添加小部件注释
交互式表单使用小部件注释来表示字段的外观并管理用户交互。我们使用这些表单元素添加到PDF中,以便更容易输入、提交信息或执行其他用户交互。
小部件注释是在特定页面上表单字段的图形表示,因此我们不能直接将其创建为注释。
每个小部件注释将根据其类型具有适当的图形(外观)。创建后,可以更改某些视觉方面,例如边框样式和背景颜色。其他属性,如文本颜色和字体,可以在附加到字段后进行更改。
在某些情况下,您可能希望一个字段出现在多个页面上,重复相同的值。 在这种情况下,通常只有一个小部件的字段可能会附加多个小部件:一个 TextField、ListBox、ComboBox 和 CheckBox 通常只有一个,而 RadioGroup 则有多个小部件,每个单选按钮一个。 填写表单的人可以使用这些小部件中的任何一个来更新字段的值,并且这也会反映在所有其他小部件中。
文档中每个位置的每个表单字段代表一个小部件注释。小部件注释的特定位置数据被添加到特定页面。每个表单字段都有几种变体。一个按钮可以是单选按钮、复选框或按压按钮。选择小部件可以是列表框或组合框。
在这个示例中,我们将学习如何在文档中添加用于导航的按压按钮。
向文档添加按钮
package com.aspose.pdf.examples;
import com.aspose.pdf.*;
import java.util.*;
public class ExampleWidgetAnnotation {
private static String _dataDir = "/home/admin1/pdf-examples/Samples/";
public static void AddButton()
{
// 加载 PDF 文件
Document document = new Document(_dataDir + "sample.pdf");
Page page = document.getPages().get_Item(1);
Rectangle rect = new Rectangle(72, 748, 164, 768);
ButtonField printButton = new ButtonField(page, rect);
printButton.setAlternateName("打印当前文档");
printButton.setColor(Color.getBlack());
printButton.setPartialName("printBtn1");
printButton.setNormalCaption("打印文档");
Border border = new Border(printButton);
border.setStyle(BorderStyle.Solid);
border.setWidth(2);
printButton.setBorder(border);
printButton.getCharacteristics().setBorder(Color.fromArgb(255, 0, 0, 255));
printButton.getCharacteristics().setBackground(Color.fromArgb(255, 0, 191, 255));
document.getForm().add(printButton);
document.save(_dataDir + "sample_textannot.pdf");
}
}
这个按钮有边框并设置了背景。我们也设置了按钮名称(Name)、工具提示(AlternateName)、标签(NormalCaption),以及标签文字的颜色(Color)。
使用文档导航操作
存在更复杂的小部件注释使用示例——PDF文档中的文档导航。这可能需要准备一个PDF文档演示。
此示例展示了如何创建4个按钮:
public static void AddDocumentNavigationActions() {
// 加载PDF文件
Document document = new Document(_dataDir + "JSON Fundamenals.pdf");
ButtonField[] buttons = new ButtonField[4];
String[] alternateNames = { "跳到第一页", "跳到上一页", "跳到下一页", "跳到最后一页" };
String[] normalCaptions = { "首页", "上一页", "下一页", "末页" };
int[] actions = { PredefinedAction.FirstPage, PredefinedAction.PrevPage, PredefinedAction.NextPage,
PredefinedAction.LastPage };
Color clrBorder = Color.fromArgb(255, 0, 255, 0);
Color clrBackGround = Color.fromArgb(255, 0, 96, 70);
for (int i = 0; i < 4; i++) {
buttons[i] = new ButtonField(document, new Rectangle(32 + i * 80, 28, 104 + i * 80, 68));
buttons[i].setAlternateName(alternateNames[i]);
buttons[i].setColor(Color.getWhite());
buttons[i].setNormalCaption(normalCaptions[i]);
buttons[i].setOnActivated(new NamedAction(actions[i]));
Border border = new Border(buttons[i]);
border.setStyle(BorderStyle.Solid);
border.setWidth(2);
buttons[i].setBorder(border);
buttons[i].getCharacteristics().setBorder(clrBorder);
buttons[i].getCharacteristics().setBackground(clrBackGround);
}
for (int pageIndex = 1; pageIndex <= 1; pageIndex++)
for (int i = 0; i < 4; i++)
document.getForm().add(buttons[i], "btn" + pageIndex + "_" + (i + 1), pageIndex);
document.getForm().get("btn1_1").setReadOnly(true);
document.getForm().get("btn1_2").setReadOnly(true);
document.getForm().get("btn" + document.getPages().size() + "_3").setReadOnly(true);
document.getForm().get("btn" + document.getPages().size() + "_4").setReadOnly(true);
document.save(_dataDir + "sample_widgetannot_2.pdf");
}
如何删除小部件注释
Aspose.PDF for Java 有从文件中删除注释的规则:
public static void DeleteWidgetAnnotation() {
// 加载 PDF 文件
Document document = new Document(_dataDir + "sample_textannot.pdf");
// 使用 AnnotationSelector 筛选注释
Page page = document.getPages().get_Item(1);
AnnotationSelector annotationSelector = new AnnotationSelector(new ButtonField(page, Rectangle.getTrivial()));
page.accept(annotationSelector);
List<Annotation> buttonFields = annotationSelector.getSelected();
// 删除注释
for (Annotation wa : buttonFields) {
page.getAnnotations().delete(wa);
}
document.save(_dataDir + "sample_widgetannot_del.pdf");
}
在 PDF 文档中,您可以查看和管理使用 3D CAD 或 3D 建模软件创建并嵌入到 PDF 文档中的高质量 3D 内容。 能够在所有方向旋转3D元素,就像你手中拿着它们一样。
为什么你需要一个图像的3D显示?
在过去的几年中,由于3D打印技术的突破,科技在各个领域取得了巨大的进步。3D打印技术可以作为主要工具应用于建筑、机械工程、设计等技术技能的教学。这些技术由于个人打印设备的出现,可以促进教育过程的新形式的引入,提高动机,并形成毕业生和教师所需的必要能力。
3D建模的主要任务是未来对象或物体的概念,因为为了发布一个对象,你需要对其设计特征有全面的理解,以便在工业设计或建筑中进行连续的再生。
添加3D注释
3D注释是使用Aspose.PDF for Java创建的U3D格式模型添加的。
-
创建一个新的Document
-
加载所需3D模型的数据(在我们的例子中为"Ring.u3d")以创建PDF3DContent
-
创建3dArtWork对象,并将其链接到文档和3DContent
-
调整pdf3dArtWork对象:
- 3DLightingScheme - (在示例中我们将设置为
CAD) - 3DRenderMode - (在示例中我们将设置为
Solid) - 填充
ViewArray,至少创建一个3D View并将其添加到数组中。
- 3DLightingScheme - (在示例中我们将设置为
-
在注释中设置3个基本参数:
- 注释将被放置的
page, - 注释所在的
rectangle, - 和
3dArtWork对象。
- 注释将被放置的
-
为了更好地展示3D对象,设置边框框架
-
设置默认视图(例如 - TOP)
-
添加一些额外的参数:名称、预览海报等。
-
向Page添加注释
-
保存结果
示例
请查看以下代码片段以添加3D注释。
public class Example3DAnnotation
{
private static String _dataDir = "/home/aspose/pdf-examples/Samples/";
public static void Add3dAnnotation()
{
// 加载PDF文件
Document document = new Document();
PDF3DContent pdf3DContent = new PDF3DContent(_dataDir + "Ring.u3d");
PDF3DArtwork pdf3dArtWork = new PDF3DArtwork(document, pdf3DContent);
pdf3dArtWork.setLightingScheme(new PDF3DLightingScheme(LightingSchemeType.CAD));
pdf3dArtWork.setRenderMode(new PDF3DRenderMode(RenderModeType.Solid));
var topMatrix = new Matrix3D(1,0,0,0,-1,0,0,0,-1,0.10271,0.08184,0.273836);
var frontMatrix = new Matrix3D(0, -1, 0, 0, 0, 1, -1, 0, 0, 0.332652, 0.08184, 0.085273);
pdf3dArtWork.getViewArray().add(new PDF3DView(document, topMatrix, 0.188563, "Top")); //1
pdf3dArtWork.getViewArray().add(new PDF3DView(document, frontMatrix, 0.188563, "Left")); //2
var page = document.getPages().add();
var pdf3dAnnotation = new PDF3DAnnotation(page, new Rectangle(100, 500, 300, 700), pdf3dArtWork);
pdf3dAnnotation.setBorder(new Border(pdf3dAnnotation));
pdf3dAnnotation.setDefaultViewIndex(1);
pdf3dAnnotation.setFlags(com.aspose.pdf.AnnotationFlags.NoZoom);
pdf3dAnnotation.setName("Ring.u3d");
//如果需要,设置预览图像
//pdf3dAnnotation.setImagePreview(_dataDir + "sample_3d.png");
document.getPages().get_Item(1).getAnnotations().add(pdf3dAnnotation);
document.save(_dataDir+"sample_3d.pdf");
}
}
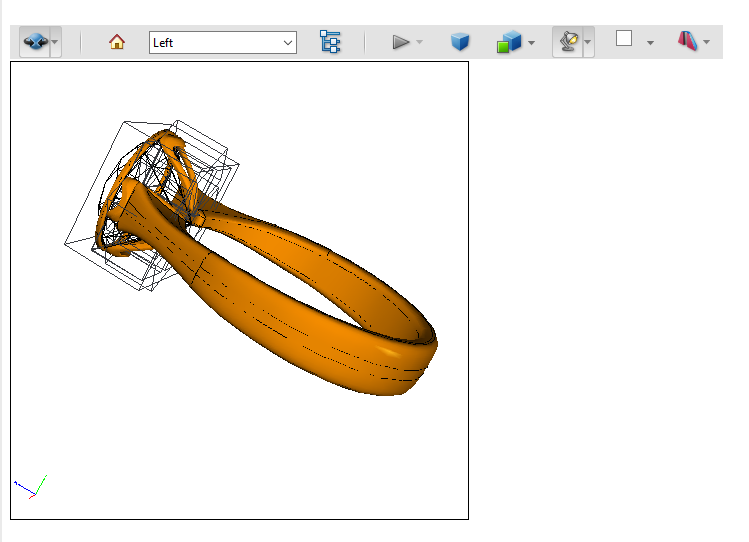
This code example showed us such a model:
这个代码示例向我们展示了这样的模型:
